How to create a client for the gRPC API in .NET?

gRPC is a compelling interface (about 10 times faster than REST) developed by Google under an open-source license. It can run in any environment. Its implementation is based on Protocol Buffers, a data serialization mechanism independent of the programming language. It is based on the HTTP/2 protocol, which supports bidirectional streaming — the connection is maintained so the server and client can send multiple requests.
In this article, I will show you how to connect to the already existing gRPC server and send the first queries using C#. I will use StabilitySDK as an example server.
Environment preparation
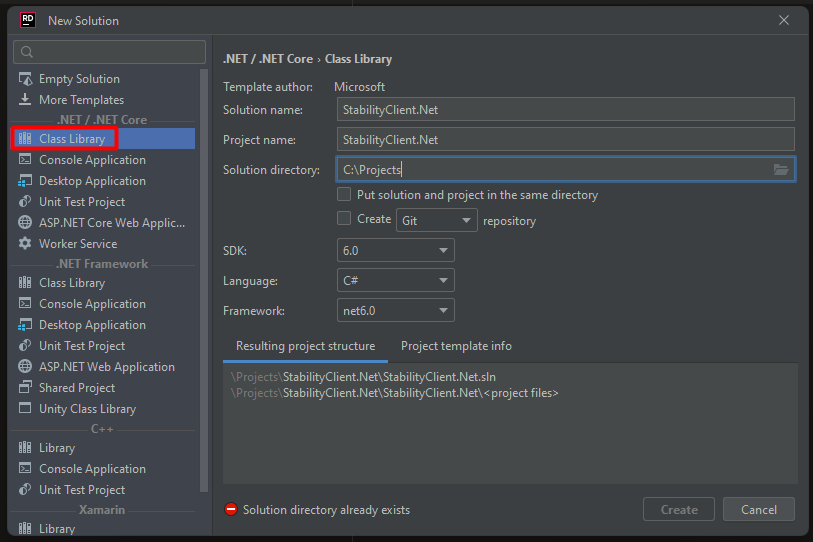
Start by creating a project. To create a client, it is best to use a library template.
The next step is to add some essential tools to make working with gRPC easier:
Grpc.Tools - enables the generation of C# code from proto files
Grpc.Net.Client - is responsible for the creation of client code based on proto-files
Google.Protobuf - adds the extended data types used in protobuf (there is a good chance that your proto files will contain these)
dotnet-grpc - .Net tool to link proto files; I add them to the project using the command:
dotnet tool install -g dotnet-grpc
If you use Rider I recommend adding the Protocol Buffers plugin, which will provide basic syntax analysis.
Addition of proto files
In the project you have created, add a Protos folder. Then get the link to the proto file you want to add to the project. On Github, it looks like the following:
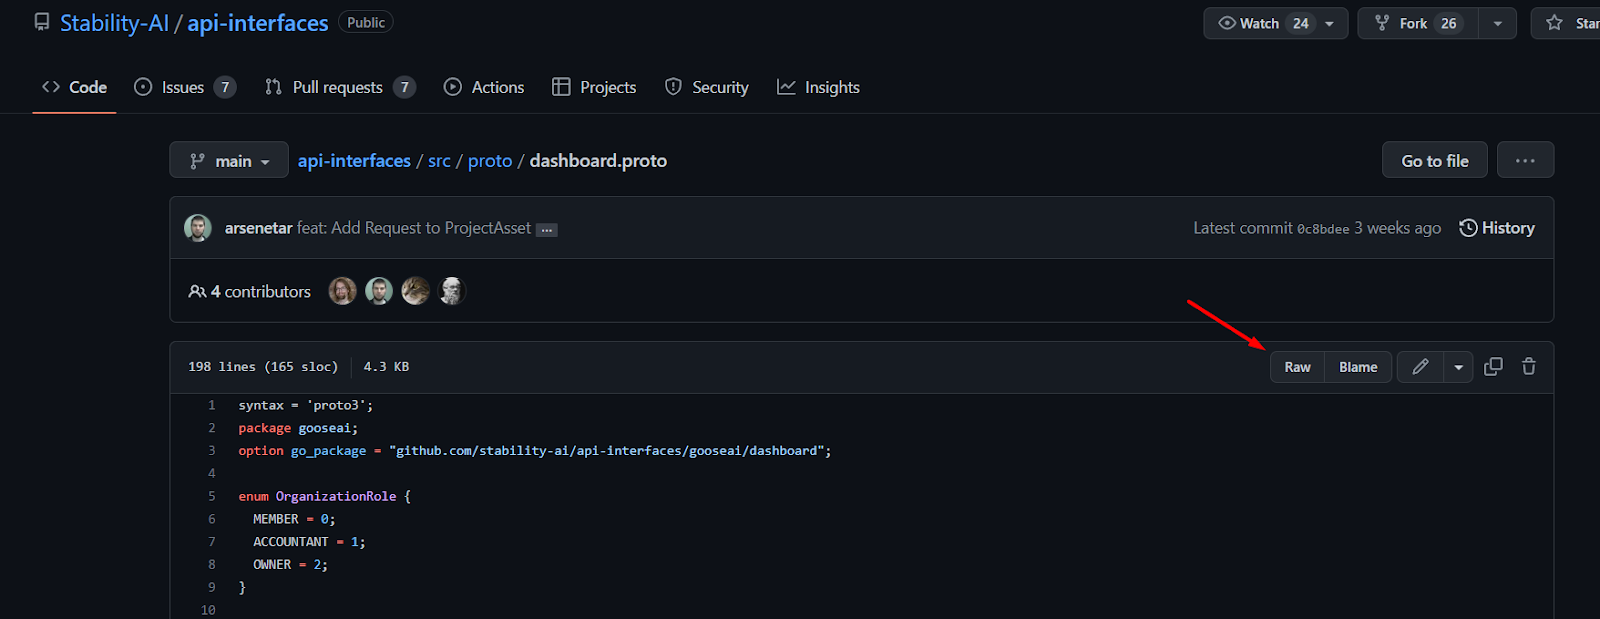
Open the proto file and then click Raw to get a clean file, without the Github interface.
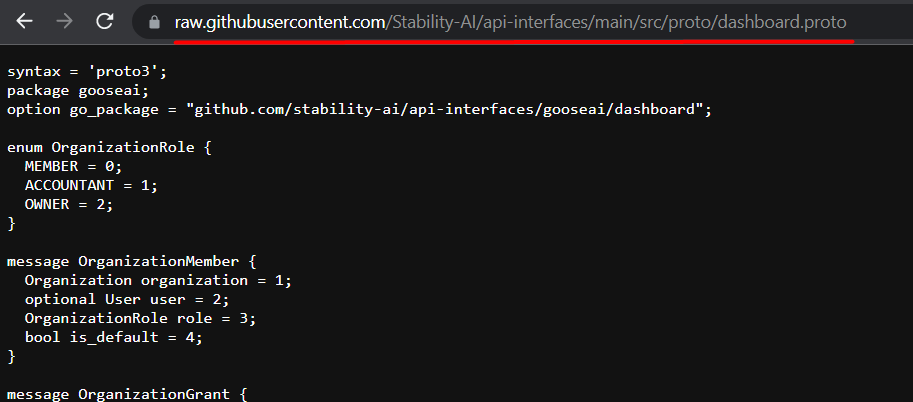
Copy the link. Next, open the terminal where you have your .csproj file and use the command with the following structure:
dotnet-grpc add-url <link-to-the-raw-file> -o <file-address>
In my case it looked like this:
dotnet-grpc add-url https://raw.githubusercontent.com/Stability-AI/api-interfaces/main/src/proto/dashboard.proto -o ./Protos/dashboard.proto
The command adds a source link to csproj, retrieves the code from the linked file, and saves it in the location specified as the command call parameter.
Once the proto files have been added, a section similar to the example below should appear in the .csproj:
<ItemGroup>
  <Folder Include="Protos" />
</ItemGroup>
<ItemGroup>
  <Protobuf Include="Protos\dashboard.proto" GrpcServices="Client">
    <SourceUrl>https://raw.githubusercontent.com/Stability-AI/api-interfaces/main/src/proto/dashboard.proto</SourceUrl>
  </Protobuf>
  <Protobuf Include="Protos\engines.proto" GrpcServices="Client">
    <SourceUrl>https://raw.githubusercontent.com/Stability-AI/api-interfaces/main/src/proto/engines.proto</SourceUrl>
  </Protobuf>
  <Protobuf Include="Protos\generation.proto" GrpcServices="Client">
    <SourceUrl>https://raw.githubusercontent.com/Stability-AI/api-interfaces/main/src/proto/generation.proto</SourceUrl>
  </Protobuf>
  <Protobuf Include="Protos\project.proto" GrpcServices="Client">
    <SourceUrl>https://raw.githubusercontent.com/Stability-AI/api-interfaces/main/src/proto/project.proto</SourceUrl>
  </Protobuf>
  <Protobuf Include="Protos\tensors.proto" GrpcServices="Client">
    <SourceUrl>https://raw.githubusercontent.com/coreweave/tensorizer/35381e3812ba342991d30b71ce257503622ae828/proto/tensors.proto</SourceUrl>
  </Protobuf>
</ItemGroup>
Instead of using the instructions given above, you can also fill it in manually and then use the command:
dotnet-grpc refresh
It compares the contents of your proto files with the source files and makes changes on this basis. If the proto files do not exist, it creates them.
In addition, it is useful to specify the ProtoRoot attribute for all Protobuf tags, where you define the root for the proto files. This is required if the proto files are used inside imports.
<Protobuf Include="Protos\dashboard.proto" GrpcServices="Client" ProtoRoot="Protos">
  <SourceUrl>https://raw.githubusercontent.com/Stability-AI/api-interfaces/main/src/proto/dashboard.proto</SourceUrl>
</Protobuf>
If you are using Rider, you can add proto file import paths to the settings. This does not affect the implementation of the code, but the IDE will then not unnecessarily highlight imports as incorrect.
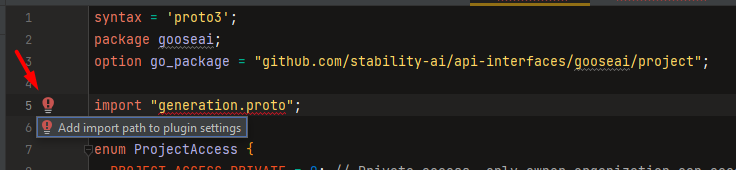
Simply click the message that appears next to the red bulb.
Client creation
The first step is to build the project. That will generate the code for the methods and types described in the proto files.
Start creating the client by creating a channel. This is used to establish a long-term connection to the API.
var channel = GrpcChannel.ForAddress(host);
The host is the address of the API you are connecting to. Optionally, you can configure the connection using GrpcChannelOptions:
var grpcChannelOptions = new GrpcChannelOptions() {
  Credentials = ChannelCredentials.Create(ChannelCredentials.SecureSsl,
    CallCredentials.FromInterceptor((_, metadata) => {
      metadata.Add("Authorization", $"Bearer {apiKey}");
      return Task.CompletedTask;
     })
  )
};

var channel = GrpcChannel.ForAddress(host, grpcChannelOptions);
In this case, I added an apiKey for authentication purposes. Additionally, I set a credential to ensure the security of the SSL connection. This step was necessary as per the requirements of the Stability API.
Full configuration options can be found in the documentation.
You can already use the specific services. These have been generated from the proto files in the project. The names of the services will coincide with the names of the proto files.
var engineService = new EnginesService.EnginesServiceClient(channel);
var engineList = engineService.ListEngines(new ListEnginesRequest());
In the first line, I create a service, with the help of the previously described channel. The service gives me access to all the methods described in the proto files. The second line is an example of a query to the Stability API.
And... done
This way you can communicate with the gRPC server using the generated client. In case the proto files change, just do a dotnet-grpc refresh and then build the project.
P.S. You can see a more elaborate, working example here.